Tutorial written by Nelson Pacheco
Some of our club’s members have asked me how to do astrophotography. I’ve replied that it’s a very difficult field of photography but that’s neither true nor fair. So I thought I’d make a few tutorial guides explaining some things for those interested. I’ll begin by saying that Astrophotography is a broad field that can be roughly divided into (1) moon, (2) planets (3) milky way, and (4) deep space (galaxies, nebula, etc). Of these 1 is simple for anyone. 2 is also simple for large planets. 3 is a little harder but can be done by the average DSLR owner with the right lens and some knowledge of Adobe Lightroom. 4 is considerably harder but can be done by the average photographer for large objects like the Orion nebula and the Andromeda galaxy. Other objects require many thousands of dollars of equipment and infinite patience. So in this post I will start with (1) the moon.
Part 1
This is my first astrophotography tutorial post, starting with the moon. This is just very basic, I will add more in other posts. The moon right now is close to a new moon, or totally dark. From here it will began getting larger (waxing) until reaching full moon at the end of November. So you can try some of what I will write beginning with quarter or half moon in the next couple of weeks.
For now, what you will need is almost any DSLR camera and the longest lens you have. Ideally this would be 200mm or longer but don’t worry if you don’t have that, you can still get some shots and learn. Cell phone shots of the moon are also possible but they are not the best, so I will just talk about DSLR photos. Besides the camera and lens I recommend an app that has info on where the moon is, what phase it’s in, where it will rise and set, and some camera parameters to use. The best I’ve seen is Photo Pills, which also works for general photography and other astro objects. It’s around $10 and well worth it. I also recommend a tripod and a remote shutter device, which can just be a time delay on your camera. If you don’t have these don’t worry, you can still get moon shots, it’s just easier if you have them. You should also start thinking about areas that have clearance to the horizon if possible although that’s hard in the Northern Virginia area. That would allow you to take a shot of the rising moon over some subject of interest in the horizon. For us, we have a lot of trees and buildings so it’s hard to get a clean horizon view, but trees and buildings (especially in DC) can make good foreground objects.
The two most important things to know about the moon for photography is (1) it’s REALLY small to the camera and (2) it’s REALLY bright. By small, I mean it’s the apparent size of a pea or an aspirin held at arm’s length. I didn’t believe this at first, but just try it. The reason it looks larger is that your mind plays tricks, especially when the moon is low on the horizon and you see it against trees or other foreground object. As far as brightness, it can be dim at the horizon but as it rises its brightness can overwhelm the dynamic range on your camera. The result is that either the moon may show detail but the foreground will be dark, or the foreground will look good but the moon will look blown out.
Part 2
Let’s talk about moon size, brightness, and photo composition. This discussion will mainly be for a rising or setting moon.
On size, since the moon looks so small to the camera (remember, an aspirin at arm’s length), we need to make it large enough for a good composition.
There are two ways to do this: a telephoto lens, or cropping the image.
A 200mm telephoto is the smallest practical lens for moon photos, and 300 or 400 is better. If you only have a 100mm, cropping it by half will give the same size as a 200mm but will make the pixels smaller by ¼. So, if you have a 24mp camera, zooming 2x will make it look like you took it with a 200mm lens but will create a 6mp photo, still good enough for social media but not for enlargements.
Even at 200mm, a moon photo will not look like those you see that have a huge moon coming up over a city or an ocean. Those are created with photoshop, and/or with a lens whose size and price will make most of us go bankrupt. Photos rising over the ocean with a huge moon and sharp detail are most probably fake. I can guarantee you from personal frustration that most oceans have humidity layers that will make the rising moon fuzzy or not visible at all. That’s ok. You can take much better photos by sticking with what is realistically possible in a moon composition.
Along with trying to make the moon appear larger, a better technique is to make the foreground proportional to the moon, and that will create the illusion that the moon is larger. To do this, pick a good foreground object, a tree, a building, water, anything. Then shoot the moon in proximity to that object. Since the moon size will not change except for focal length or cropping, you need to position yourself so that the foreground object appears larger or smaller depending on your distance to it.
Next is the problem of brightness, especially after the moon has risen for an hour or so. The moon is so bright that, except for moonrise or set, your camera will not expose correctly for both the moon and the foreground.
In that case one technique commonly used is to take two or more photos, exposed correctly for either the moon or the foreground, then merge them in HDR. Adobe Lightroom has an HDR feature that does this pretty easily. Some cameras have built in HDR and that may or may not work, and for moon shots it probably will not work because the algorithms have a hard time adjusting to both the moon’s size and brightness.
When the moon is rising or setting, the atmosphere attenuates the brightness so you can shoot it and the foreground on the same photo. To do this, here are some rules of thumb:
Use manual focus. Auto focus algorithms have a hard time with the moon.
Focus on the foreground, not the moon. Even if the moon is a bit out of focus you will not notice it unless you are very close to the foreground. Or close your f stop to increase your depth of field to get everything in focus.
Use a tripod whenever possible and a remote shutter to avoid camera shake
Use the initial “Moon 11” rule settings: aperture to f11 and shutter speed = ISO. For example, for ISO 100 use 1/100s shutter speed, for ISO 400 use 1/400s shutter speed etc.
Bracket your exposures by moving away from the Moon 11 setting up and down for a few shots.
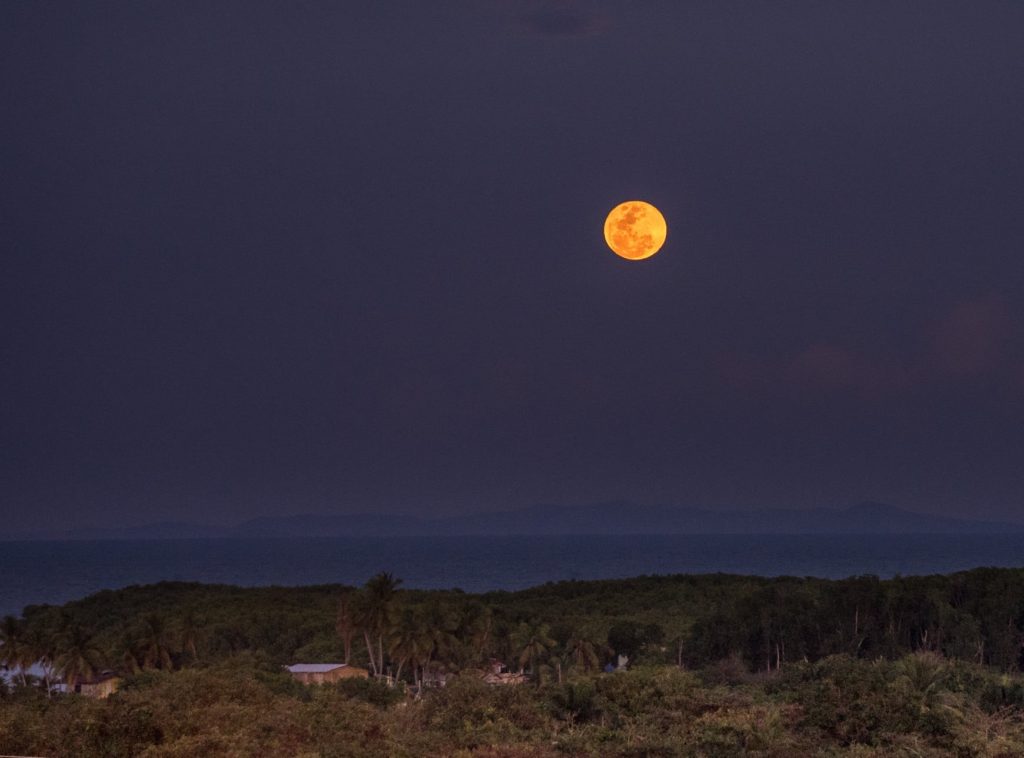
This is one photo I took in the Caribbean using these guidelines. I used a 210mm with a 1.7 converter, so about 350mm equivalent.
In the next post I will talk about how to find the moon phases and how to plan your shot perfectly ahead of time so you know what time the moon will rise and where it will rise.
Part 3
This will be the last and most important post on shooting the moon. I will cover how to know when the moon will be full (or in some other phase), and where and at what time to position yourself relative to your foreground object to get the shot you want.
To just get the moon phase, there are a number of ways to do it.
Here is one free web site that has a moon calendar, but there are many more. https://www.almanac.com/astronomy/moon/calendar
It’s good to know when the full moon will be, and if you know exactly where it will rise in relation to your foreground that is all you need.
But say you want to travel around and take a moon rise over, say, the Jefferson Memorial. Then you need to know exactly when and where the moon will be relative to the Memorial and relative to where you will be standing.
As I mentioned above, by far the best app to do this is Photo Pills, around $10 for the iPhone and Android platforms.
I will now go step-by-step on how to do this with Photo Pills. It will seem complicated at first but if you stick with it, you will have a new world open to you for planning your moon shots (as well as sunrises or sunsets). I am including a screen shot of an actual plan to shoot the full moon rising over the Jefferson Memorial in DC on November 30.
- Open Photo Pills
- Tap on Planner
- Slide the top menu left or right until you get to one that shows Sun, Moon, and rise/set times and azimuth
- Touch the moon symbol at the top left and it will switch between moon phases.
When you see the full moon, the date and time at the bottom (with the graph) will be set to the full moon. (Alternatively: On the home screen, tap on Moon, then on Calendar at the bottom and you will see all the phases). - Place a red pin next to the subject you want to photograph. This red pin will represent your shooting position.
To do this, tap on Load at the bottom then do a search for what you want to photograph, e.g., the Jefferson Memorial. Tap on It and it will appear in the map with a red pin on it.
The lines going to it are: light and dark thick blue, moon rise and set directions. Yellow is sun rise and red is sun set direction. Thin blue line is the moon direction at any time.
If you slide your finger across the bottom graph to change the time you will see the thin line move. - Place a black pin on the same subject. That black pin represents the moon, scaled to the actual size the camera sees.
To do this, slide your finger across the top panel several times until you see a red and black pin icon on the top left. Tap on this and a black pin will appear close to the subject.
Don’t put it on top of a building, put it on the ground next to where you want the moon to appear. You can put your finger on the black spot and move it. - Find your shooting position.
To do this, zoom the map out and find a spot you want to shoot from. Once you see it, put your finger on it and hold it down. The red spot will show up along with the moon and sun directions.
Now slide your finger across the bottom graph and you will see the moon direction change along with the time. Find a good time when the moon is where you want it relative to the building.
The best time is “blue hour” which is a bit after sunset. At this point you may have to change your shooting position so the moon is in the right spot. If you tap the time graph and hold it will expand so you can move more precisely. To go back, tap and hold again
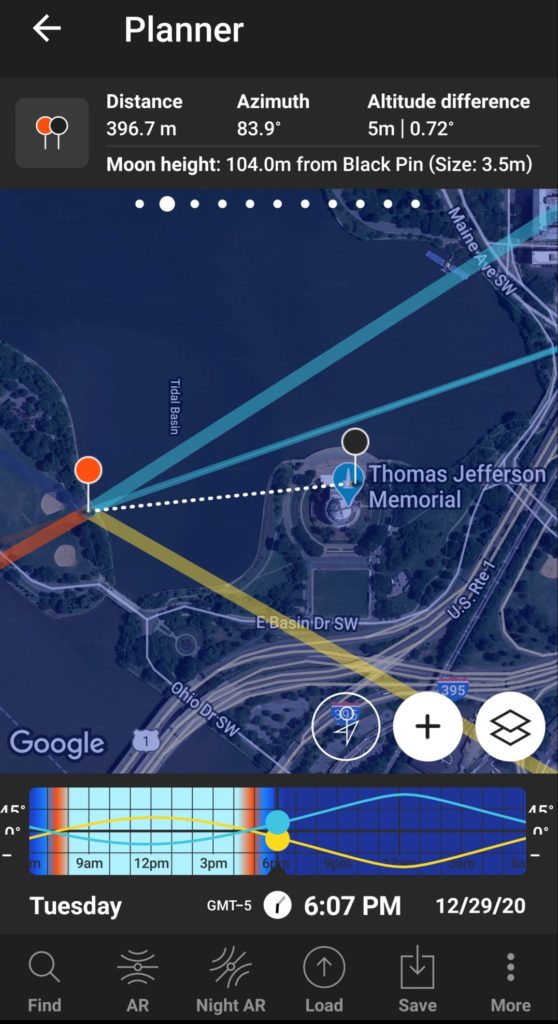
At the top panel you will see the moon height change as you change the time. This helps if you want to plan your shot so the moon is at a certain height above or below the foreground subject.
There is much more that photo pills can do but if you get this far you will know when and where to be to get a shot of the moon at any of its phases.
Here is a link to a video that follows this process and has more information.
https://www.photopills.com/…/how-plan-photo-next-full…
I hope this has helped you get great moon shots. My next posts will be on shooting planets, the milky way, and deep space objects.